Stuart Keeler Stuart Keeler
President/owner

Why Work Hardening Is So Important

September 1, 2009
0
Comments


An attendee loudly made an important comment during a recent PMA seminar on sheetmetal forming. “When my steel work hardens during forming, it stalls the press. Where can I purchase steel without work hardening?” The ensuing discussion explained how stretchability and bendability are possible only when materials work harden. The real solution would depend on the actual cause of the press stalling—insufficient tonnage or lack of energy replacement. Inserting steel without work hardening would only create a major disaster.

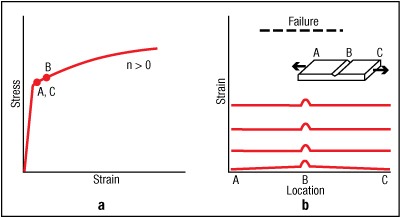
Fig. 1—Schematic a shows how zone B continues to deform to failure at a constant stress, while zones A and C remain elastic. Schematic b shows the resulting severe strain gradient.

Assume a sample of steel without any work hardening capacity is being stretched (sketch inserted into Fig. 1a). The sample has a constant cross-section from end A to end C except at zone B. Here a scratch, slight reduction in thickness, or some other reason creates a reduced cross-section at zone B. Since stress is pulling force divided by cross-sectional area, the stress level at B is higher than the rest of the sample. To initiate deformation, the pulling force is slowly increased and then halted when zone B reaches the yield strength. Since the remainder of the sample (zones A and C) has less applied stress, these locations are still in the elastic region (see data points on the stress-strain curve in Fig. 1a.) However, once started zone B continues to elongate and reduce its cross-section, thereby moving to the right along the flat stress-strain curve. This deformation continues until the sample breaks at zone B.

Since the rest of the sample is still in the elastic region, the stress goes back to zero and any elastic deformation is reversed as the sample breaks. This results in a very severe and highly localized strain gradient (Fig. 1b). The average useful stretch over the entire length of the sample is almost zero, making steel without work hardening useless for almost all practical stampings containing a tensile force. This includes the outer fibers of a bending operation that also are subjected to stretching.

Fig. 2—Schematic a shows work hardening forces zones A and C to follow zone B up the stress-strain curve as the tensile force is increased. The strain distributions in schematic b remain almost flat at different amounts of deformation.

The equation describing the rate of work hardening is , where s is the true stress, K is a material constant, e is the true strain and n is the work hardening exponent. A nigh n-value means a higher rate of strain hardening. In contrast to the zero work hardening capability described above, sheetmetal with work hardening has a drastically different deformation sequence.

Using the same deformation mode in the above example (Fig. 2b), the higher stress in zone B again causes this zone to reach the yield strength first and deform. However, because of work hardening, the strength in zone B increases and the deformation stops. To continue deformation, the tensile force on the sample must be increased. Now all zones plastically deform, work harden and climb up the stress-strain curve (Fig. 2a). The strain gradient is zero except for the small bump at zone B (Fig. 2b). The tensile load must be increased to continue further deformation. Each increase in load creates the same deformation pattern but at higher levels of strain. Under these conditions, a very high average strain (useful deformation) can be attained in the sample before the failure limit is reached.

Fig. 3—The higher rate of work hardening (higher n-value) in schematic a allows the same stress increase to be attained with less strain. This reduces the severity of the strain gradient (schematic b).
If a small amount of work hardening does such an excellent job of preventing a sharp strain gradient, why would one need a large amount of work hardening? Remember that the two previous examples used a flat sample that was uniormly loaded in tension throughout its entire length. Most sheetmetal stampings are more complex and generally involve a punch being pushed into the sheetmetal blank (Fig. 3b). This local application of the punch force plus the bending deformation often concentrates the deformation in one area. The amount of stress in the forming area can be much higher than the stress in the surrounding areas. A strain gradient wants to develop.

A material with a low amount of work hardening must undergo a large amount of strain before the rest of stamping can begin contributing to the deformation. In Fig. 3a, assume a stress level of x is required to yield the entire blank. The lower n-value sheetmetal must deform to a high strain level (L) to achieve a stress of x necessary to yield the rest of the blank. The high strain under the punch and the low strain in the rest of the blank create a severe strain gradient (Fig. 3b). However, a higher n-value sheetmetal (Fig. 3a) reaches the same stress level of x with a much smaller level of strain (H) that results in a lesser strain gradient (Fig. 3b).

A good understanding of work hardening is invaluable for design, tryout and production in press shops in most industries. Therefore, the discussion of work hardening and the associated n-value continues next month. Included topics are how n-value changes with different materials, strengths, processing and applications. MF

Industry-Related Terms: Bending, Blank, Forming, Thickness, Work Hardening
View Glossary of Metalforming Terms

Technologies: Materials

Comments

Must be logged in to post a comment.
There are no comments posted.

Subscribe to the Newsletter

Start receiving newsletters.