


 This article is an excerpt from an online presentation provided by Miller Electric Mfg. LLC, Appleton, WI;
 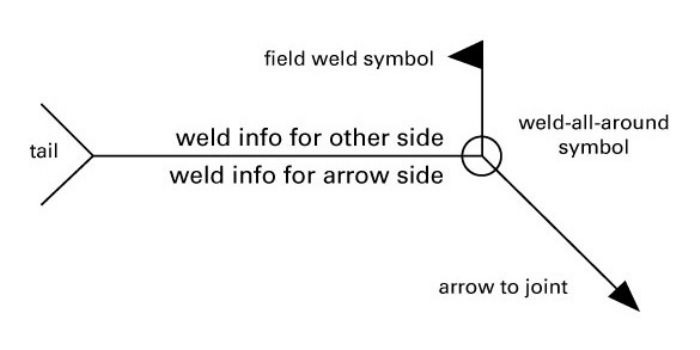 In a weld-symbol layout, the horizontal line, called the reference line, acts as the anchor to which all of the other welding symbols are tied. The instructions for making the weld are strung along the reference line. An arrow connects the reference line to the joint to be welded. In the example shown in Fig. 1, the arrow is shown growing out of the right end of the reference line and heading down and to the right, but many other combinations are allowed.
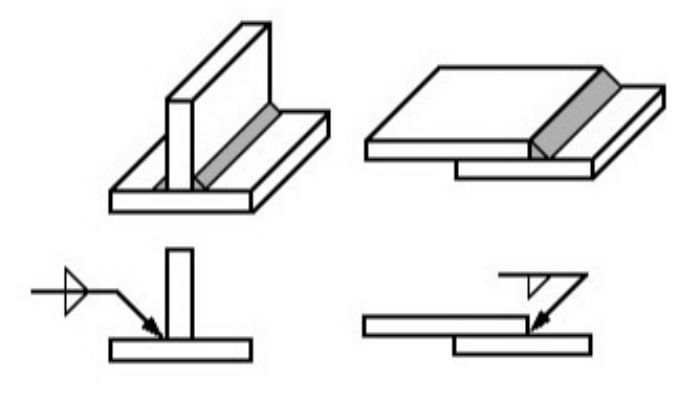
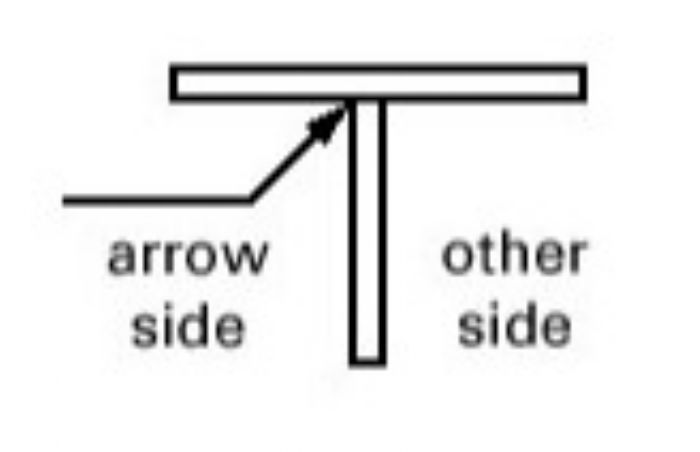 Quite often, the arrow points to a joint with two sides; therefore, it presents two potential places for a weld. For example, when joining two steel plates into a T shape, welding may occur on either side of the T stem. The weld symbol distinguishes between the two sides of a joint by using the arrow and the spaces above and below the reference line. The side of the joint to which the arrow points is known (rather prosaically) as the “arrow side,” and its weld is made according to the instructions given below the reference line. The other side of the joint is known (even more prosaically) as the “other side” (Fig. 2), and its weld is made according to the instructions given above the reference line.
 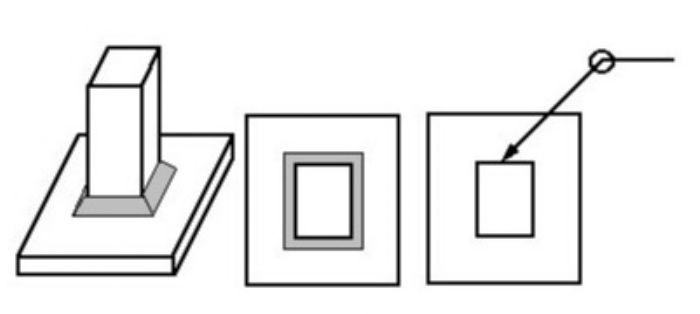 A flag growing out of the junction of the reference line and the arrow appears if the weld is to be made in the field. A weld symbol without a flag indicates that the weld should be made in the shop. In older drawings, a field weld may be denoted by a filled black circle at the junction between the arrow and the reference line.
The open circle at the arrow/reference line junction is present if the weld is to travel all the way around the joint (Fig. 3).
 Supplementary information on the weld appears at the tail of the weld symbol. It may contain a reference to the welding process, the electrode, a detail drawing or any information that aids in the making of the weld that does not have its own special place on the symbol.
Types of Welds and Their Symbols
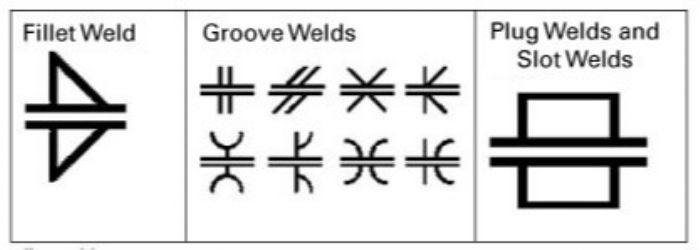
 Each welding position has its own basic symbol, typically placed near the center of the reference line (and above or below it, depending on the side of the joint to which it applies). The symbol, a small drawing, usually can be interpreted as a simplified cross-section of the weld (Fig. 4). Let’s look more closely to symbols related to fillet welds, plug welds and slot welds.
Fillet-Weld Symbols
The fillet weld is employed for lap, corner and T joints. As its symbol suggests, the fillet weld is roughly triangular in cross-section, although its shape is not always a right or an isosceles triangle. Weld metal is deposited in a corner formed by the fitup of the two members and penetrates and fuses with the base metal to form the joint.
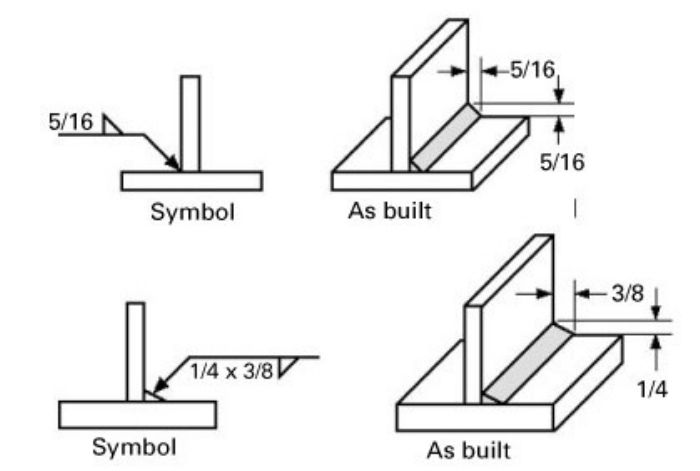
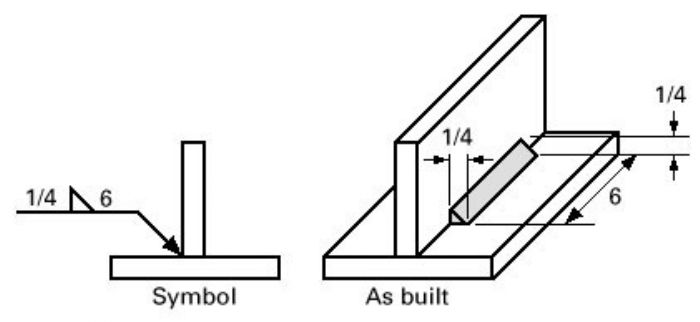 The perpendicular leg of the triangle always is drawn on the left side of the symbol, regardless of the orientation of the weld itself (Fig. 5). The leg size is written to the left of the weld symbol. If the two legs of the weld are to be the same size, only one dimension is given; if the weld is to have unequal legs (much less common than the equal-legged weld), both dimensions are given along with an indication on the drawing as to which leg is longer (Fig. 6).
The length of the weld is given to the right of the symbol (Fig. 7).
 If no length is given, then the weld is to be placed between specified dimension lines (if given) or between those points where an abrupt change in the weld direction would occur, such as at the end of the plates as shown in Fig. 7.
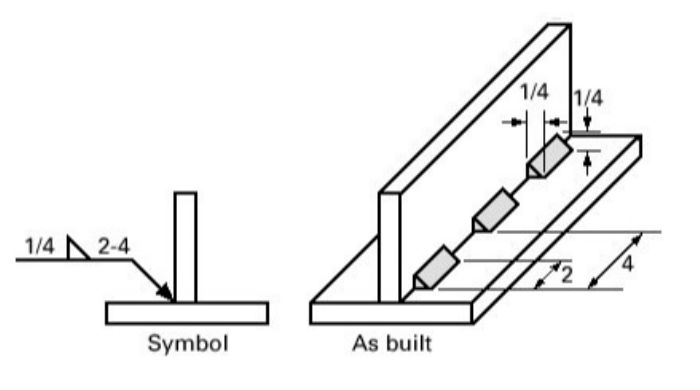
For intermittent welds, the length of each portion of the weld and the spacing of the welds are separated by a dash (length first, spacing second) and placed to the right of the fillet-weld symbol (Fig. 8). Notice that the spacing, or pitch, does not denote the clear space between the welds, but rather the center-to-center (or end-to-end) distance.
Plug-Weld and Slot-Weld Symbols
 Plug and slot welds join overlapping members, with one member containing holes (round for plug welds, elongated for slot welds). Weld metal is deposited in the holes and penetrates and fuses with the base metal of the two members to form the joint.
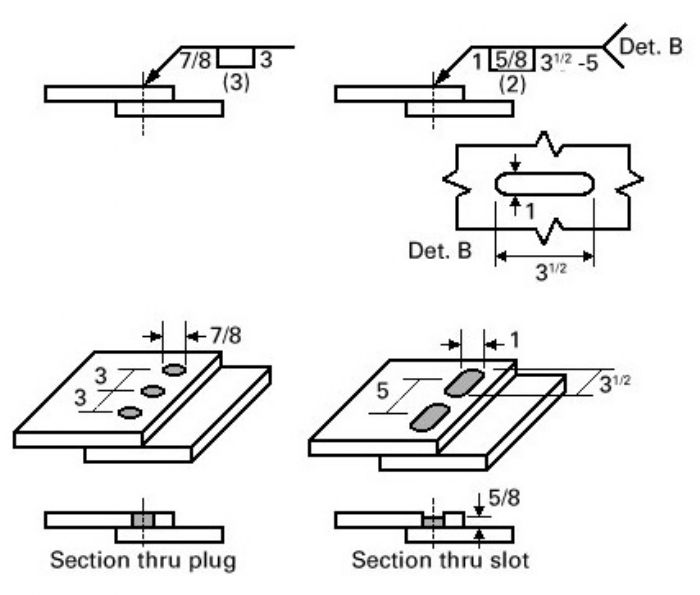
For plug welds (Fig. 9), the diameter of each plug is given to the left of the symbol, with the plug-to-plug spacing (pitch) provided to the right. For slot welds, the width of each slot is given to the left of the symbol, with the length and pitch (separated by a dash) provided to the right. A detail drawing is referenced in the tail. Parentheses located above or below the weld symbol contain the number of plugs or slots. The arrow-side and other-side designations indicate which piece contains the hole(s). If the hole should not be filled completely with weld metal, the depth to which it should be filled is provided within the weld symbol.
 For more information, see ANSI/AWS A2.4, Symbols for Welding and Nondestructive Testing. And look for a description of grove-weld symbols in the October 2020 issue of MetalForming. MF
View Glossary of Metalforming Terms
See also: Miller Electric Mfg. Co.
Technologies: Welding and Joining
Comments
Must be logged in to post a comment. Sign in or Create an Account
There are no comments posted.
 Welding and Joining
AWS Releases Updated Standard for Welding Terminology
Wednesday, March 19, 2025
 Welding and Joining
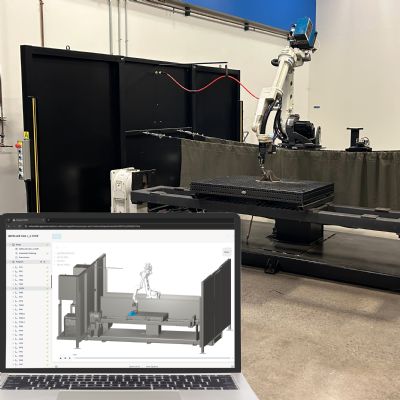
Offline Programming for Miller’s PerformArc Robotic-Welding ...
Friday, March 14, 2025